Update sites in the P2 era

Lately I have built several update sites during Eclipse development – e.g. for the last release of the Debug Visualisation plugin, or some related to VIATRA2 based articles (maybe more details later). They have all one thing in common: they were not created using Update site projects.

In my experience since P2 came as a provisining platform the Update site projects were not the best available solutions: at first (in Ganymede) they did not produce everything P2 needed, while produced legacy information, that triggered a backward compatible mode in the provisining platform (officially the old Update managers site.xml should not be used). Even worse, I experienced some serious errors, when trying to add a new version of the already added plug-ins to the already built update site – in most cases the category definitions were removed (as in Galileo by default all features without category are hidden, this problem is quite serious).

On the other hand, not too long ago classic update sites were also needed to provide update sites for both the Update manager and P2. Today the Update Manager compatibility is not as crucial, as all Eclipse versions supported by eclipse.org use P2, so it is better to use some dedicated P2-based mechanism for Update site creation.

This mechanism is present since Eclipse 3.4 (at least from the command line, as documented in the Eclipse wiki), but is a bit hard to use. Recently I found a somewhat hidden option in the GUI, that provides the P2 metadata generation functionality – just as needed.

To use this, at least one (or possibly more) features are needed – the features are the minimum installable units. When the features are ready and the related plug-ins are attached, the Export wizard has to be invoked with the Deployable Features wizard from the Plug-in Development category.

The deployable features and the destination should be selected as needed (in my experience the directory export makes possible the easiest update site deployment, while the zipped archive allows the easiest direct transport – e.g. for dropins).
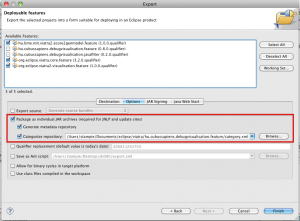
The export deployable features wizard in action
Export deployable features wizard

The P2-related magic should be initiated on the Options page: if the Generate metadata repository option is selected, as in the screenshot, during the export all metadata needed by P2 is generated.

For categorization of the repository a specific xml-file should be created: by creating a Category Definition from the New… wizard a simple form-based editor can be used to define categories for the installer, that can also be selected using the Export wizard.

Some additional tips and tricks related to the deployment:

  • To update existing P2-based update sites, simply point the export destination to the already existing update site. This updates the existing update site – I only tried this using the directory-based output.
  • To avoid runtime issues, make sure that the exported plug-in projects use the needed Java version compatibility in the project settings (e.g. if the manifest requires Java 1.5, make sure the project gets compiled in Java 1.5 compatibility mode), as the plug-ins are recompiled using these settings. I managed to get a Java 1.5 compatible project compiled with Java 1.6 compliance settings – the plug-ins even got installed, but did not work in the target computer, instead a hard to debug runtime exception is thrown.
  • It is possible to add source boundles by selecting the appropriate checkbox. On the other hand I couldn’t find a way to set the display name of the generated source bundles, and they are shown with the same name as the non-source plug-in, making it hard to distinguish between them during runtime. If you know the solution, please let me know.

In general, this export mechanism works well, without any major issues, I tested in repeatedly with several update sites. Unless for some reason Update manager compatibility is needed, I don’t recommend using Update site projects anymore – simply export your features to deploy.

What does the Eclipse of a Summer god mean a developer?

A month ago the Eclipse 3.6 shipped – again on time.

This is another evolutionary release – most components are binary compatible with the older ones, so the time of the migration was roughly equal to the download. All old favorites, such as Mylyn, EMF, etc. are updated, a lot of features were added, that makes development much easier. Some new components are also added, making a strong basis of the Eclipse eco-system.

The release features several improvements to the update mechanism, thus providing a whole new level of support for installing 3rd party plug-ins. These methods are based on the brand-new P2 provisioning API: the Modeling, Subversive or Mylyn Connector Discovery functions allows installing very specific plug-ins (making it easier to search for them), while the Eclipse Marketplace Client allows installing a wide selection of plug-ins (and this list keeps growing).

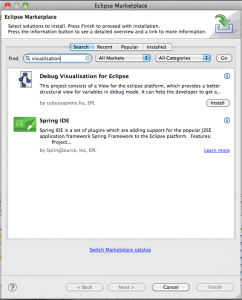
The Eclipse Marketplace Client allowing the installation of the Debug Visualisation plug-in
The Eclipse Marketplace Client in action

This solution is great, because I don’t have to remember/google for the various update site urls, and then manually select the features – if I don’t want to. If for whatever reason I need the specific knowledge, the “old” P2 user interface is still available.

A minor, but welcome addition is to the P2 interface the reliable cache clearing mechanism. It comes in handy when testing a new update site.

The Helios release is full of other gems, such as the graduated Xtext 1.0 with its new builder support, or the enhanced Variables and Breakpoints views in the Debug perspective.

My other favorite feature is the enhanced Cocoa-64 bit support for OSX – its performance/resource consumption is greatly improved, while the Dock icon overlays are also helpful (e.g. I can monitor the status a long-running task, while using another application).

Short text overlay over the dock icon

Alltogether, the new release contains quite a few enhancements, that help the developers to provide better software using the framework, while maintaining the compatibility with older releases, thus making the switch easy (and possibly cheap) to do. I can hardly await the next (Indigo) release, and I’m looking forward to the new ideas of the e4 project.

Generating LPG 1.0 parsers on OSX using Eclipse

In fall I began maintaining the parser of the VIATRA2 framework. Funny.

Mostly because it uses the LPG parser generator framework, and to make things worse, a very old version (v1.1) of it. Today it is available a new 2.0 version (since 2008), but they are not compatible at all, e.g. they define define packages in the LPG runtime. As the release was near, there was no chance of upgrading the parser, so we were stuck with version 1.0.

The problem with the old version is, that although it is written in C++, even its makefile uses explicitely the Visual C++ compiler, so simply compiling it for OSX is not possible. That means, every time I have to change the grammar file, I have to start a Windows binary. And I like to do it from Eclipse.

My two chances were Wine and VMware (not Parallels, because I don’t have a licence for it 🙂 ). The latter is too hard on resources and is so much harder to integrate with my Eclipse in OSX, so the first choice was Wine. Luckily the Wine developers did quality work, so the LPG generator binary can be run with wine.

The Eclipse integration is not too hard (at least in a basic way, that would work for a while), as there is support for running External tools using the appropriate icon from the toolbar (or from the Run menü).

Such an External tool can be parameterized using various variables of Eclipse, of which two are needed:

  • [cci]$resource_loc[/cci]: the file system path (not workspace-relative path) of the selected resource
  • [cci]$container_loc[/cci]: the the container folder’s (or directory) location, that holds the selected resource (also in the file system)

The tool will be the wine installation, as it will execute the lpg.exe binary, that will receive it as a runtime parameter. This way both the location of the lpg.exe binary and the lpg parameters have to be written to the tools parameters section. It is important to note, that the location of the lpg binary can be given using OSX paths, there is no need to translate them into Wine paths, Wine can handle native OSX paths.

LPG uses a working folder, where it puts the generated parser and AST classes. This will be defined using the [cci]$container_loc[/cci] variable.

LPG needs three types of information: the grammar file (that can be given as a parameter to LPG, we will use the [cci]$resource_loc[/cci] variable), an includes directory (for grammar snippets) and a templates directory (for parser and lexer templates).

The directories can either be found in the working directory (this is needed for local templates), given as parameters or set as environment variables. I choose the third one, as it seemed the most maintainable solution.

For this reason the [cci]LPG_INCLUDE[/cci] and the [cci]LPG_TEMPLATE[/cci] environment variables have to be set on the Environment variables tab respectively.

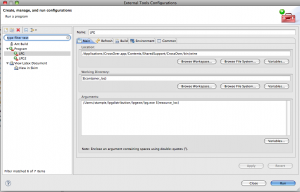
The described settings (except the environment variables) are shown on the following screenshot:

Running LPG with Wine on the current selection

After these settings are done, by selecting the parser.g file, it becomes possible to run this new tool, that will generate the various parser-related Java classes.

After running the tool, the console output of the lpg generator is shown, where all paths are listed beginning with [cci]Y:\[/cci], although the selected files appear in the folder structure of the Eclipse workspace.

There are some minor shortcomings of this integration: first I cannot use the pop-up menu to execute this tool, as the external tools are not listed. Another annoyance is, that the file has to be selected in Navigator view, the open editor is not enough.

This means, I have to select first the file in the Project Navigator (or Package Explorer, etc.), then run the tool manually from the Run configuration menu. Quite disturbing, but the grammar does not need to be changed too often.

Another problem is, that the error output of the generator is not back-annotated as Eclipse errors (problem markers), only a console output is available. For a brand new grammar this would be not the best solution, but for maintenance it is enough.

The LPG IDE of the IMP (IDE Metatooling Platform) project overcomes this challange by using a newer version of LPG, that is written in cross-platform C (or C++), and uses a builder (that automatically calls the LPG binary if the grammar files are changed), and the builder results are showed as proper error messages.

This means, the future for LPG development in Eclipse is the LPG IDE, but for legacy projects it cannot be used. In these cases my solution can become a good alternative.

Packaging Eclipse in OSX

Recently I experimented a bit with Eclipse packaging. At first it seems not very important, given that the folks at Eclipse work hard to produce executable packages. On the other hand, the Mac OSX packaging is not the best possible one.

The default folder structure of Eclipse applications on Mac OSX is something like follows:
[cc]eclipse
–configuration/
–dropins/
–features/
–p2/
–plugins/
–Eclipse.app/
–artifacts.xml[/cc]

In this structure Eclipse.app is a special folder, that acts as an executable item for OSX.

This structure is easy to produce, very similar to the ones of Windows or Linux, but there are some drawbacks. First, in the /Applications folder the folder icon is a generic folder, instead of an Eclipse icon (okay, this one is easy to resolve, as every folder can have a custom icon). More importantly, all indexer try identifies the executables by name. If there are multiple Eclipse instances installed, then every instance will have the same name displayed. If the path is also displayed, it is possible to distinguish between the instances.
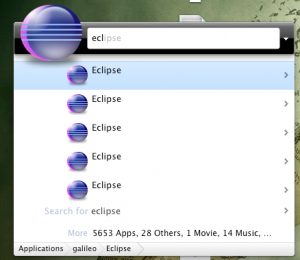
Multiple Eclipse instances shown by the same name

Some time ago (~1 year) I tried simply renaming the Application bundle did not work, as there is seems to be some kind of configuration that won’t work after that. But this was quite a time ago.

Now I found another possible solution: there is an Eclipse repackager script shared in GitHub I could give a try.

The script is a simple bash script, with simple parametering:

[cc_bash]./EclipseOSXRepackager «eclipse source folder» «target.app»[/cc_bash]

A quick testing showed it does not handle dropins, so I hacked and shared a new version (and meanwhile I was able to test Git for the first time – btw. thanks for the fine tutorials, GitHub team 🙂 ).

My updated solution is available also from GitHub: http://github.com/ujhelyiz/yoursway-eclipse-osx-repackager

To tell the truth, even the updated script has some serious issues: I could break the app two ways: the smallest issue was, that P2 could not install or remove anything, or in the worse case the bundle couldn’t even start.

So I have a quick question: does anyone has a working solution for creating proper, working app bundles for OSX from Eclipse? Or simply could help fixing the repackager script?

Eclipse GEF wtf

Az előző kitérő után most térjünk vissza egy kis kocka témához. A minap érdekes felfedezést tettem, miközben véletlenül a GEF belső kódjába tévedtem debug közben. Alapvetően egyébként meg vagyok elégedve a GEF és általában az eclipse platform minőségével, ritka az az eset, hogy a fejemet fogom egy-egy megoldás láttán.

A következő kódrészlet ugyan működik és mivel a publikus api elrejti, az átlag fejlesztő nem találkozik vele, mégis érdemes rávetni egy pillantást. További szócséplés helyett következzék a kód, szerintem magáért beszél:


//AbstractEditPart.class

private Object[] policies;

//...

/**
* @see EditPart#installEditPolicy(Object, EditPolicy)
*/
public void installEditPolicy(Object key, EditPolicy editPolicy) {
Assert.isNotNull(key, "Edit Policies must be installed with keys");//$NON-NLS-1$
if (policies == null) {
policies = new Object[2];
policies[0] = key;
policies[1] = editPolicy;
} else {
int index = 0;
while (index < policies.length && !key.equals(policies[index])) index += 2; if (index < policies.length) { index++; EditPolicy old = (EditPolicy)policies[index]; if (old != null && isActive()) old.deactivate(); policies[index] = editPolicy; } else { Object newPolicies[] = new Object[policies.length + 2]; System.arraycopy(policies, 0, newPolicies, 0, policies.length); policies = newPolicies; policies[index] = key; policies[index + 1] = editPolicy; } } if (editPolicy != null) { editPolicy.setHost(this); if (isActive()) editPolicy.activate(); } }

Akinek nem világos elsőre, kifejteném a problémát: láthatóan egy tömböt használ a java-ban alapértelmezésként elérhető "Map" funkcionalitásának a kiváltására. A tömb páros (és nulladik) helyén szereplő elem tárolja a kulcsot, az utána lévő páratlan helyen lévő elem az érték.

Minden elem hozzáadásakor dinamikusan növeli a tömb méretét, törléskor meg egyszerűen null-ra állítja a tömb megfelelő elemét. Ehhez még társul egy custom iterátor is, ami a tömb nem null elemeit listázza.

Őszintén nem értem a tervezési döntést, ami a tömb-alapú Map-hez vezethetett. A memóriaigénye a HashMap-nek nem sokkal több, és mivel jellemzően kis elemszámú esetek fordulnak elő, ez nem számottevő. A sebessége a HashMap-nek jobb, a "get" és "put" metódusok általános esetben konstans, de mindenképpen kevesebb a tömb végigjárásánál. Mindennek a tetejébe a fenti kód Map alkalmazásával kb. 3 sorra cserélhető, nem beszélve az osztály egyéb kódjáról, ami a tömböt piszkálja.

Egyetlen érthető mentségként csak arra tudok gondolni, hogy esetleg a kód korábban íródott, minthogy a java collections API-ba belekerült volna a Map. Ez viszont az 1.2-es verzióban történt meg, tehát elég régen. Nem tudom mennyi idős a GEF, így ezt nem tudom eldönetni.. Mindenesetre ez a kód nálam megütötte a WTF szintet.