How I recorded my part for the Virtual Choir

When I heard of Eric Whitacre’s Virtual Choir, I was immediately sold. After a lot bit of procrastination, I finally got to recording my part. However, things went not as easy as I had thought.

The first obstacle I encountered was that my MacBook’s built-in microphone is extremely noisy, so I had to record the video and audio separately, since there’s anyway a conductor track to synchronize to (so the video and audio won’t shift out of sync, there will be only temporary discrepancies), and I will attempt the recording multiple times anyway.

The next unpleasant surprise: playing a video consumes so much CPU that the fan is turned on, which is way too noisy. This was also a showstopper. I would have tried CPU throttling, but unfortunately cputhrottle didn’t work: the binary archive was corrupted, and the source couldn’t in any way compile. I almost gave up, when the LG GT540 Android smartphone I just got for this Christmas came into mind: it could serve perfectly as the video player!

This also wasn’t easy as pie, though. After downloading the video with Video DownloadHelper and copying it to the SD card, Android’s pre-bundled Media Player couldn’t open it. I found the excellent arcMedia player, which could play it, but at an impossibly slow frame rate. So I had to resize it: I chose HandBrake, and with the preset iPod conversion profile selected (320×192), the downgraded video played smoothly even in the built-in Media Player.

So I finally grabbed the phone, my Yamaha Pocketrak 2G recorder and the printed sheet music (I preferred the SATB score to the part), and dwelved into the music. (Of course, our neighbor’s dog barked into the silence at the end – I already expected that, but I managed to cut it out.)

However, replacing the audio track of the video was also hampered: iMovie ’08 can’t import the clip it recorded to a project, so I had to Google again. After another fair amount of time, I found SimpleMovieX, which suited my needs. I separated the video & audio track, added the new audio track to the video, synchronized them a bit and at last, the dubbed version was ready.

You can view the result here. I’m glad to finally be able to join a worldwide choir in this innovative social media experiment.

Generating Java code from EMF models automatically

EMF provides a nice code generation facility for generating Java class hierarchy from ecore models. There is support for hand-made modifications to the generated code, or a large selection of generation parameters are available through a generator model.

However, we had a different need together with the VIATRA2 project: we explicitly forbid in our internal policy modifications to the generated Java code in order to avoid non-reusable models, and as this way the generated code does not contain any extra information to the generator model, we do not want to store the Java classes in our Subversion repository.

Another minor obstacle was that the code generation does not happen automatically (e.g. as in the LPG editor of the IMP project) – so simply not committing the generated code to the repository would mean a manual invocation of the generator that is inconvenient.

Luckily, the code generator is available using specific ANT tasks, allowing to write a build file that describes how to generate the required Java code, reusing the existing build model if necessary:

<emf.Ecore2Java
 genModel="org.eclipse.viatra2.gtasm.model/model/gtasmmodel_updated.genmodel"
 model="org.eclipse.viatra2.gtasm.model/model/gtasmmodel.ecore"
 generatemodelproject="true"
 generateeditorproject="true"
 generateeditproject="true"
 reconcilegenmodel="reload" >

Some interesting points:

  • As the selected Ant task is provided by an OSGi plug-in, it is important to set the Runtime JRE to the same one as used by the workspace, otherwise the called task will not be found.
  • As the genmodel generator is not available as an Ant task, the ecore2Java task was used. In this case it is important to use the reconcilegenmodel attribute to avoid the unnecessary override of the genmodel
  • Regardless of the value of the generate*project attributes if the *project were not given as sub-tags, the corresponding code was not generated. This seems like a bug for me, as this duplicates information already present in the genmodel, but I am not sure.
  • The code generator does not set the generated files Derived attribute, thus it is not excluded from the svn repository. Unfortunately, it is not possible without writing custom tasks, as there is no such command (yet) in Eclipse (but hopefully the patch gets committed in Indigo).

This ant task mimics the GUI-based code generators functionality, thus fulfilling our needs, except two things: it does not exclude generated code from the repository, and does not run automatically.

The repository exclusion is resolved using a hack: the src folders are listed in all generated projects in the svn:ignore variable – thus manually disallowing their sharing. This approach works well, because if no code is generated, the src folder might be missing, that is marked with a very explicit error message (as it is still referenced in the project properties), but if the task is executed, the folder is created as well (and the source folder reference will be working).

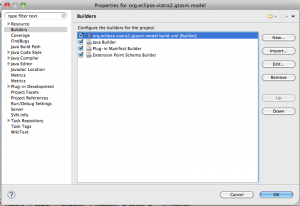
For the automatic building Eclipse provides a neat way: External tools (e.g. Ant scripts, or shell scripts, etc.) can be added as project builders. A Run configuration has to be created for the selected task, that can be added to the project. This means, our script is executed each time the selected project changes

The Ant task has been set as a custom builder
Builders page in the Project properties

Finally, some other modifications were made to the task in order to provide a more standard build: first, as not the entire project is generated at every invocation of the script (the projects could not be deleted, because the generator does not support setting the version number of the generated edit and editor projects), if all project stubs are downloaded from the repository, the build order might not be adequate. To overcome this, a manual build is executed for all projects at the end.

A second modification is a clean task, that removes all source folders, in order to provide a “clean”, out-of-the-box experience for a regeneration. This task can also be registered at the builder properties.

The full, modified script looks as following (using Gist from Github):

Update: the eclipse.build tasks are not available in Eclipse, as mentioned by a comment. They are provided by the Buckminster tool, and are not required for the EMF code generation, so it is safe to remove them. However, in this case the refreshing and building of the projects have to be managed in another way (e.g. registering the Ant script as an External builder for the projects).

This simple script helps in a lot of cases – and because the ecore models does not change very often, its performance is not really an issue (we have quite a large ecore model, so the generator runs about 30-40 seconds). My main issues are the following:

  • I don’t like to reproduce information from the genmodel in the build script. I am not entirely sure which information is read from the genmodel and which is inferred from the parameters, making the solution a bit volatile.
  • The missing derived flag command. It would be quite a nice touch if the code would take care of it.

Alltogether, if you like it, feel free to use it (licensed under EPL). I also would be glad if somebody could give me a hint about how to enhance the script – this is only my second Ant build script, so I don’t know the language very well. 🙂

Markers and Annotations in Eclipse for Error Feedback

Motto:

Ninety per cent of most magic merely consists of knowing one extra fact.
Terry Pratchett, Night Watch

Development in Eclipse keeps fascinating me, as there are a lot of very thoroughly designed services and features integrated to allow detailed customization – on the other hand, “with big power comes big responsibility”, but at least a steep learning curve. I had such an experience with the problem handling support not long ago.

We developed our own textual language, that provided error markers and editor annotations as error feedback. The problem was that the editor annotations were sometimes missing: our planned functionality worked like we like to add an annotation each time our marker was added, but the annotations were not always updated (so we got an inconsistent state between markers and annotations – but not every time).

Of course that was caused by the fact that we were rolling out our own implementation of marker/annotation synchronization – we were not aware that the JFace TextEditor provides such a service out of the box – and I did not found it documented on the various locations (that’s why this blog post is born 🙂 ).

Our requirements

First of all, lets assemble the various ways Eclipse editors can provide error feedback:

  • The most basic (and least usable) way is the use of pop-up windows – they are annoying, and not persistent (after pressing a button, they disappear, before the error could be solved).
  • Writing to the Error log view – a bit better, but the log could be overwhelmed, if the messages are too many, because they cannot be deleted when the problem is solved.
  • Displaying the error in the Problems view – that’s one of the standard places, where parse errors should be displayed. The problems view is generated by reading (and filtering) the error marker type (org.eclipse.core.resources.problemmarker).
  • Marking the files in the Project Navigator view with a small symbol, if they contain errors/warnings. This is also handled using the previously mentioned error marker.
  • Underlining the erroneous parts in the editor. For this reason annotations should be added to the JFace Document Model used by the JFace TextEditor component.

The basic idea is to create a marker and an annotation each time a problem is found. The problem with annotations, that creating them requires some connection with the editor object, or at least the document model, but our parser should not depend on the editor (core component should not depend on the GUI!).

Mark My Words!

The management of the markers is well described in the Mark My Words tutorial. Basically markers are attached to IResources, and provide a simple key-value interface with a freely definable key set (and the IMarker interface specifies some commonly used keys).

Following the tutorial we could create our own marker with the parent of the org.eclipse.core.resources.marker marker, after this adding the markers to the selected files managed the error display in the Problems and Project Navigator views.

So our marker definition looks as follows:

   <extension
         id="vtclparsermarker"
         name="VTCL Parsing Problems"
         point="org.eclipse.core.resources.markers">
      <super
            type="org.eclipse.core.resources.problemmarker">
      </super>
      <persistent
            value="true">
      </persistent>
   </extension>

The problem marker understands severity, error message and line number parameters, and is capable of displaying them in the Problems view.

IMarker marker = file.createMarker(markerId);
 marker.setAttribute(IMarker.SEVERITY, severity);
 marker.setAttribute(IMarker.MESSAGE, message);
 marker.setAttribute(IMarker.LINE_NUMBER, line);

Annotating the document manually

As stated before, markers could be added easily without knowing anything about who has opened the file currently, so they are really useful for error feedback, but this information should be also available in the open editors.

Our first idea may be to create some glue code, that listens to the marker changes, and updates our editor accordingly. The drawbacks of this approach are first the fact that we have to code something that trivial, and the second (as we saw in our project), that the editor update could be quite tricky (missing or not deleted annotations).

My theory is, that we have encountered some kind of race condition with our naive implementation, as the annotation creation code was always executed, but sometimes the results were lost. So, in the end, this listener is not so trivial. 🙁

Automatic annotation display

This was the part that gave us the most headache – we did not understand, what caused the inconsistent display problem. On the other hand, knowing one extra fact (“magic”) the problem is trivially solvable.

So, here comes the Eclipse magic: we don’t have to create this service manually, we should reuse the already existing one. For that, we would need that our marker also become a child marker of the org.eclipse.core.resources.textmarker, and a minimal set of position data should be added to the marker.

This position information is described by the start and end offset value – instead of the human-readable line/column position information a machine-readable single position is used: the number of characters that has to be read from the start of the string stream. Its lucky, that most parser generators provide such output that this information is trivially available from the AST level

   <extension
         id="vtclparsermarker"
         name="VTCL Parsing Problems"
         point="org.eclipse.core.resources.markers">
      <super
            type="org.eclipse.core.resources.problemmarker">
      </super>
      <persistent
            value="true">
      </persistent>
      <super
            type="org.eclipse.core.resources.textmarker">
      </super>
   </extension>

And the marker creator Java code looks as follows:

IMarker marker = file.createMarker(markerId);
marker.setAttribute(IMarker.SEVERITY, severity);
marker.setAttribute(IMarker.MESSAGE, message);
marker.setAttribute(IMarker.LINE_NUMBER, line);
if (pos.offset != 0) {
  marker.setAttribute(IMarker.CHAR_START,pos.offset);
  marker.setAttribute(IMarker.CHAR_END,pos.offset+pos.length);
}

After that, the platform uses a default implementation, that provides the well-known wriggly underline to annotate our text files with the associated markers.

Summary

Altogether, the following steps are needed to provide a simple error reporting for our existing editor:

  • Create a custom marker type
    • With a supertype of org.eclipse.core.resources.problemmarker to display the report in the problems view
    • With a supertype of org.eclipse.core.resources.textmarker to underline the errors in the textual editor
  • Create a marker instance
    • Setting the IMarker.SEVERITY, IMarker.MESSAGE and IMarker.LINE_NUMBER attributes for the Problems view.
    • Setting the IMarker.CHAR_START and IMarker.CHAR_END for the editor annotations.

Conclusion

The Eclipse text editors provide a well-defined, easy to use error reporting mechanism nearly for free. The main catch is, we have to be careful to set everything – if something is missing, we got the silent failure issue – no exception is thrown, but something is not shown.

The biggest issue in our implementation was that the IMarker.CHAR_START and IMarker.CHAR_END marker attributes are ignored, if the used marker is not a text attribute, making this problem hard to identify.

A fine thing with this error reporting mechanism is, that it is independent of the concrete text editor used: when we changed our implementation in the VIATRA framework, the resulting reports were visible in every text editor (e.g. the dedicated VIATRA text editor, or the default text editor in Eclipse) – thus helping error recovery.

Presentation theme for Eclipse

In the last year I often had to held live presentations of Eclipse development. At that point a typical problem is, that the font sizes used during development are too small for the projector.

The possible solutions are either ignoring this fact, using a special environment, where all the appropriate settings have been made, or tweaking the development environment. The tweaking will not work, as several settings should be made, and they are easy to forget, while the special presentation environment seems too much of a hassle for me. This left as the only choice to ignore the fact.

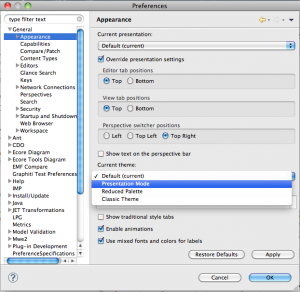
But finally I had some hacking time, so I created a Presentation theme for Eclipse, that solves tweaking by a single selection of the user interface: Themes can be selected in the General/Appearance tab on the Preferences page.

The Presentation theme can be selected=

Currently, the theme description is a bit hacky: for every platform the default font is copied by hand to the plugin.xml (using a Windows 7, a OpenSuse 11.3 Linux and a Snow Leopard machine). More research is needed to solve this in a more generic way. Luckily only four fonts have been redefined by the theme.

Some things missing: support for resizing elements in JFace viewers (such as EMF tree editors or CNF views), and the theme was not tested with graphical editors – although they can be resized using the Zoom control.

Finally, an early alpha version can be downloaded from our update site: http://eclipse.cubussapiens.hu

I’m looking for some feedback, or either alternative implementation ideas; I think, others have already met these problems.

The source is available from GitHub.

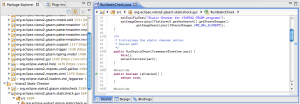
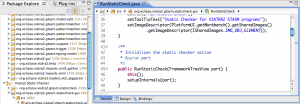
Update: before/after screenshots below.

The default theme on OSX uses small fonts
Before: The default theme
The Presentation theme uses increased font sizes
After: Presentation theme

New features in the Debug Visualisation plug-in

After a month, some bugs from the Debug Visualisation version 0.8.0 have been fixed. Most notably, the incorrect trimming of long titles, and a case, where arcs were incorrectly removed from the graph.

Two minor new features were also introduced: it is possible to turn off name trimming, and the values of variables is now displayed as a hover.

I created a screencast to show these new features (and also some other, as the last screencast was created over a year ago.

(If the embedded video does not show in your feed reader, you can watch it on YouTube.)